
So excited to finally share our playroom makeover!
It’s been in the works for a while because I’ve had to do it piece by piece when I have a free hour here or there (#workingmomproblems), but it’s finally done! And we are really loving it and using it a lot!
Read on to hear why we decided to makeover our formal living room into a playroom and how I did it (including all of the product links).
The Backstory
Our home has 3 bedrooms, an open family room right off the kitchen, a walkthrough doorway from the kitchen to a dining room, which has a case opening to the formal living room that has a case opening on the other side of it to the hallway right at the front door. The 3 bedrooms are fully utilized (master, nursery and guest room/office). The family room is our primary hangout spot (where our main, comfy sofa is and open to the kitchen). We very rarely used the dining room and almost never used the formal living room. I actually never really decorated the formal living room because I just wasn’t sure what to do with it. It seemed silly to spend a bunch of money decorating it as a living room that we would never use. It’s a pretty large space, but it’s right off the front entrance so I was hesitant to use it for anything “functional” that would look messy. We really needed space for a playroom and, also, for our home workout equipment (mainly my Peloton bike and some dumbbells). So shortly after Hudson was born we moved the dining table and side table (where we keep our nice dishes and serverware) to the formal living room (since we weren’t using it for anything else anyway) and made the dining room a sort of mixed playroom/workout room (and had my desk in there at the time, so /office too).


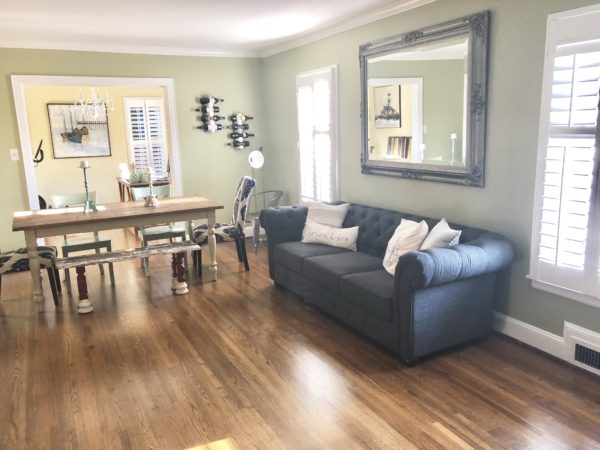
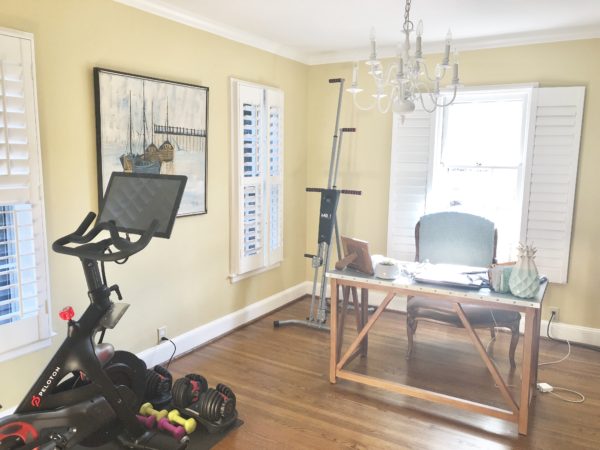
As I’m sure any of you reading this that have toddlers can imagine, this worked fine…until Hudson became mobile. It became clear very quickly that his playroom could not be the same space with large equipment that could be dangerous for a kid to mess with (which is why you no longer see the toys in the picture above). And honestly, we really never used it as a playroom because we weren’t going to hang out in there with him (nowhere to sit, etc.). So we ended up always having his toys in the family room. And we still had this huge wasted space in the front of the house.
So I finally started coming around to the idea of transitioning the formal living room into a playroom. I came up with some decor ideas that I felt like would be cute/functional for a playroom, but that weren’t too “kid-ish” so that we could still use it for entertaining when we (infrequently) need to. So the plan was to move the dining table/stuff back into the dining room, move my desk into the guest room (not ideal, but neither are super frequently used currently), and move the Peloton and dumbbells into our bedroom (also not ideal, but we did have a little space against a wall where it could fit).
Creating a Multi-Purpose Playroom
My décor inspiration started with this peel and stick nude buffalo check wallpaper. I completely fell in love with the look and felt it was fun for a “kid space” but also neutral/stylish enough for when it needed to be an “adult space.” I also loved that it provided an easy, affordable, non-permanent option for transforming the room a bit. After I got the hang of it with the first 1 or 2 panels, it was pretty easy to put up, and I think the finished product looks fantastic!
Peel & Stick Buffalo Check Wallpaper
I don’t love the green wall color that was in this room when we bought the house, but it just wasn’t in the cards right now to paint the entire room, but this provided enough of a “face lift” that I can live with it for a while 😉
I liked the idea of black and white against the nude buffalo check, and we already had 2 of these black Ikea bookshelves that we could use for toy storage. The buffalo check paired with the black led me to the idea of kind of a “light” camping theme for the room, but nothing too outrageous or “theme-y” so that I still could use it as an adult space (and since it’s right off our front door). We also already had this teepee that Hudson got for his birthday that I knew I wanted to incorporate, so the camping theme was a perfect fit!
The last major décor decision was a rug. I struggled with this one a bit. I wanted something that added a bit of color to the otherwise neutral room, but nothing too busy because of the buffalo check pattern already on the wall. I finally found this rug from West Elm and instantly new it was perfect! It adds some little pops of color that really compliment the wallpaper and the camping theme well, and pulled in the deep blue color of the sofa we already had in that room. I got the 6×9 size during a sale so it was actually under $300, which I thought was great for that large and high quality of a rug! It’s really soft, has decent cushion, and doesn’t shed.
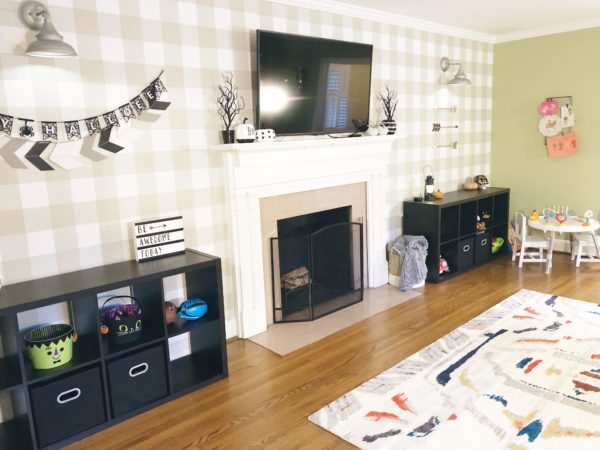
So here’s the finished room!

Lighting is a struggle in this room. The only electrical in the room is a few outlets near the floorboards, and we didn’t want to pay to have electrical run. We have 2 freestanding lamps from Ikea that I don’t love, but they provide decent light. So I was really excited when I came across the Magic Light Trick from @nestingwithgrace ! It’s a way to get additional light without running electrical by using battery operated lights in sconces! Check out her blog post on exactly how to do it here. I went with these outdoor galvanized metal sconces to stick with the “camping/outdoor” theme, and I absolutely love how they turned out! They come with a remote to use for turning on and off and even have a timer function. Such a great hack!
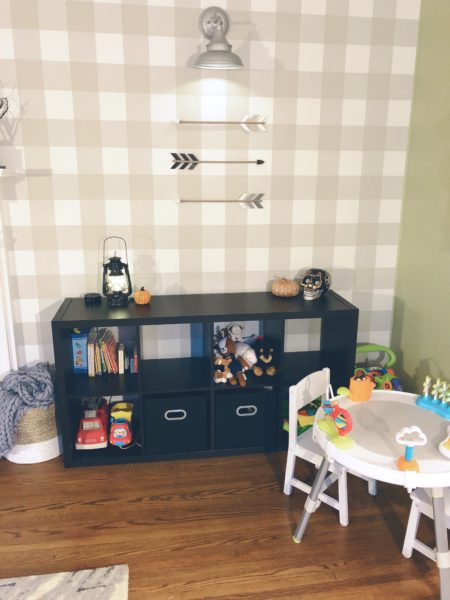

Sconces
Magic Light Trick Lights
Bookshelves
Cube Storage
Arrow Wall Art
Camping Lantern
Basket – Home Goods
Chunky Knit Throw
Arrow Banner
Be Awesome Today Sign
(Basically all Halloween decoration from the Target dollar bins)
As I mentioned, I didn’t want to go overboard with the theme stuff, so I just grabbed a few little things from Hobby Lobby that stuck with the camping/outdoors theme but were still neutral and not too childish. Of course, I also added some fun Halloween decorations for October. I love that the neutral base of this room will allow me to easily add in fun decorations to the mantel and top of the bookshelves for different seasons/holidays! I also wanted to have a place in the playroom to display art that Hudson makes, so I got this little wire hanger from Hobby Lobby that allows me to just use clothespins to clip different artwork on it.
Hudson got this teepee for his birthday, and I knew I wanted to incorporate it into the playroom. The grey and white stripe went with the neutral theme, but I was a little stumped as to what to put in the bottom of it to make it comfortable for him to sit and play in. After a lot of searching, I actually ended up getting this customizable dog bed (in the largest size) from Shutterfly! I love the print on the fabric, which really goes with the camping theme, and it’s super comfy! He loves to bring me a book and lay in there with me for story time, which might just be my new favorite activity!
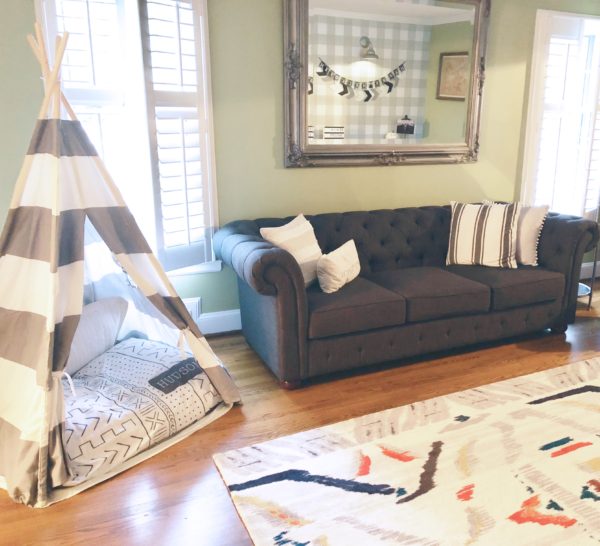
I am really loving how the room turned out! We use it every day, so it’s a way more functional use of our space. As you may be starting to realize, we’ll probably need a little more space if our family grows any bigger, but for now this plan works and I think really makes the most of the space we currently have.
Thanks for following along on this fun makeover!
Xo,
Shannon
